【Android笔记】 Window 及其工作原理
概念
Window 表示窗口,是负责承载 View 的模型,不管是 Activity,还是 Dialog、Toast 等,他们的 View 都是附加在 Window 上,可以说 Window 是 View 的直接管理者。对于 Window 的操作都需要通过 WindowManger,而 Window 的管理者则是 WindowManagerService(WMS),Window 的创建和结束都需要 WMS 执行,所以 WindowManager 需要和 WMS 进行交互,而 WMS 运行在系统进程,所以它们之间的交互是一个 IPC 过程。
使用
上文提到,WindowManager 是操作 Window 的入口,故而在往 Window 中添加 View 时使用的是 WindowManager(WM)。
WM 是一个接口,它和 ViewGroup 一样继承了 ViewManager,所以 WM 添加、更新和删除 View 和 ViewGroup 的操作是一致的。
public interface WindowManager extends ViewManager {}
public interface ViewManager
{
    public void addView(View view, ViewGroup.LayoutParams params);
    public void updateViewLayout(View view, ViewGroup.LayoutParams params);
    public void removeView(View view);
}
WM 添加 View,其中的 WindowManager.LayoutParams 也是继承自 ViewGroup.LayoutParams 。
WindowManager.addView(View, WindowManager.LayoutParams);
WindowManager 怎么获得?可通过 Context 的 getSystemService() 方法获取,如果是 ActivityContext 获取(WM 在创建 Activity 时就已创建),则创建出来的 Window 有父窗口,在 Window 在该 Activity 结束时结束;如果是 ApplicationContext 获取,则 Window 没有父窗口,在 Application 结束时才结束。WM 是一个接口,WindowMangerImpl 是 WindowManger 的实现类,getSystemService() 最终返回的是 WindowManagerImpl 对象。
WindowManager.LayoutParams
LayoutParams 用于描述 Window 的属性,如窗口类型(type)、显示特性(flags)、token 等。
窗口类型
Window 有三种类型,Window 的类型通过 WindowManager.LayoutParams 中的 int type 变量来体现。type 值越大,它所在的层级越高,type 值小于它的 Window 都将位于它的下方。
- 应用 Window,1~99。
- 子 Window,1000~1999。
- 系统 Window,2000~2999。
WindowManager.LayoutParams 中也定义了一些值:
public static final int FIRST_APPLICATION_WINDOW = 1;
public static final int FIRST_SUB_WINDOW = 1000;
public static final int TYPE_SYSTEM_ALERT       = FIRST_SYSTEM_WINDOW+3;
public static final int TYPE_TOAST              = FIRST_SYSTEM_WINDOW+5;
public static final int TYPE_SYSTEM_OVERLAY     = FIRST_SYSTEM_WINDOW+6;
...
显示特性
WindowManger.LayoutParams 还有成员变量 int flags ,用于描述 Window 的显示特性。
//window 不需要焦点
public static final int FLAG_NOT_FOCUSABLE      = 0x00000008;
//锁屏时 Window 也可显示在屏幕上
public static final int FLAG_SHOW_WHEN_LOCKED = 0x00080000;
···
token
按照我的理解,LayoutParams 中的 token 是一个窗口的标识,当一个 Window 被添加时,需要判断 token 是否满足条件,上面说了有三种类型的 Window,这三种 Window 被添加时需要满足:
应用 Window,它的 token 必须是 Activity 的 token
子 Window,它的 token 必须是父窗口的 token
系统 Window,token 为 null
当发生 “token null is not for an application” 时可指定 type 为系统 Window 解决。
Window 工作原理
这里说明 Window 的创建过程及其添加、更新和删除 View 的过程。
创建过程
Android 中,当 Activity 、Dialog 、Toast 和 PopupWindow 等组件被创建时都会创建相应的 Window,其中 Dialog 使用的是系统的 Window,Dialog 的创建过程和 Activity 差不多,这里只记录 Activity 的创建过程。
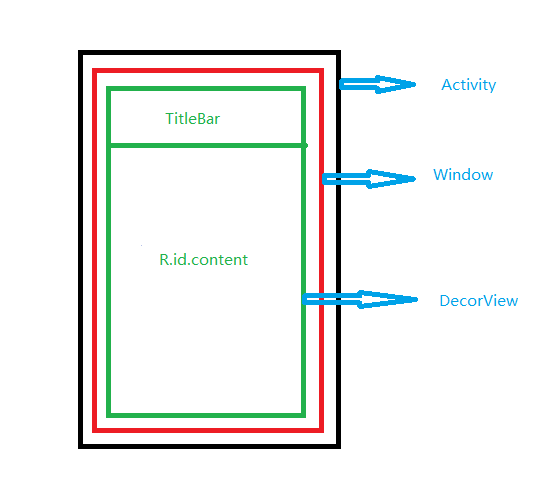
上面是一个Activity 的视图结构,Activity 中的 Window 创建是在 Activity.attach() 中实现的,attach() 方法是在 ActivityThread 启动 Activity 时执行的方法。Window 是一个 抽象类,在 attach() 中创建的是 PhoneWindow 对象。另外 WindowManager 也是在该方法内创建的。
ps: 这里是 android 7.0 的源码,不同的版本可能有所出入
private Activity performLaunchActivity(ActivityClientRecord r, Intent customIntent) {
  ...
    activity = mInstrumentation.newActivity(
    cl, component.getClassName(), r.intent);
  ...
    //为 activity 绑定上下文环境
    activity.attach(appContext, this, getInstrumentation(), r.token,
                    r.ident, app, r.intent, r.activityInfo, title, r.parent,
                    r.embeddedID, r.lastNonConfigurationInstances, config,
                    r.referrer, r.voiceInteractor, window);
  ...
}
final void attach(Context context, ActivityThread aThread,
                  Instrumentation instr, IBinder token, int ident,
                  Application application, Intent intent, ActivityInfo info,
                  CharSequence title, Activity parent, String id,
                  NonConfigurationInstances lastNonConfigurationInstances,
                  Configuration config, String referrer, IVoiceInteractor voiceInteractor,
                  Window window) {
  ...
    //创建 Window
  mWindow = new PhoneWindow(this, window);
  //设置 Window 的回调
  mWindow.setWindowControllerCallback(this);
  mWindow.setCallback(this);
  mWindow.setOnWindowDismissedCallback(this);
  mWindow.getLayoutInflater().setPrivateFactory(this);
  //这个方法中会创建 WindowManger
  mWindow.setWindowManager(
    (WindowManager)context.getSystemService(Context.WINDOW_SERVICE),
    mToken, mComponent.flattenToString(),
    (info.flags & ActivityInfo.FLAG_HARDWARE_ACCELERATED) != 0);
  if (mParent != null) {
    mWindow.setContainer(mParent.getWindow());
  }
  mWindowManager = mWindow.getWindowManager();
  ...
}
创建了 Window 之后,需要完成的就是把 Activity 布局中的 View 都放到 Window 当中去,这些操作都在Activity 的 setContentView() 中进行。
public void setContentView(@LayoutRes int layoutResID) {
  getWindow().setContentView(layoutResID);
  initWindowDecorActionBar();
}
PhoneWindow 中的 setContentView() 大致流程如下:
1. 创建 DecorView(顶级 View)
2. 将 Activity 布局文件添加到 DecorView 的 Content 中,即上图的 Content 部分
3. 通知 Activity 视图发生变化,Activity 实现了 Callbck 接口,但 onContentChanged() 是个空方法
public void setContentView(int layoutResID) {
    if (mContentParent == null) {
        //1.创建 DecorView(顶级 View)
        installDecor();
    }
    ...
    //2.将布局文件添加到 DecorView 的 Content 中
    mLayoutInflater.inflate(layoutResID, mContentParent);
      ...
       final Callback cb = getCallback();
      ...
    //3.通知 Activity 视图发生变化
    cb.onContentChanged();
      ...
  }
mContentParent 是一个 ViewGroup,可以理解为上图的 Content 部分,如果它为 null,说明 DecorView 可能没有创建,此时先创建 DecorView,DecorView 是 FrameLayout 的子类。
 private void installDecor() {
     if (mDecor == null) {
      //new DecorView()
       mDecor = generateDecor(-1);
      ...
    }
   ...
    if (mContentParent == null) {
          //生成 Content 部分
        mContentParent = generateLayout(mDecor);
        ...
    }
 }
public static final int ID_ANDROID_CONTENT = com.android.internal.R.id.content;
protected ViewGroup generateLayout(DecorView decor) {
    ...
    ViewGroup contentParent = (ViewGroup)findViewById(ID_ANDROID_CONTENT);
    ...
    return contentParent;
}
这里的 com.android.internal.R.id.content 就是上图的 R.id.content 部分,所以 Activity 布局文件中的 View 最终都会放到 content 之中。
添加过程
WM 继承了 ViewManager,WindowManagerImpl 是 WM 的实现类,所以 Window 的添加从 WindowManagerImpl 开始:
  @Override
  public void addView(@NonNull View view, @NonNull ViewGroup.LayoutParams params) {
      applyDefaultToken(params);
      mGlobal.addView(view, params, mContext.getDisplay(), mParentWindow);
  }
WMImpl 使用的是 WindowManagerGlobal 进行处理:
public void addView(View view, ViewGroup.LayoutParams params,
    Display display, Window parentWindow) {
    ...
      if (parentWindow != null) {
            parentWindow.adjustLayoutParamsForSubWindow(wparams);
      }
  ...
    root = new ViewRootImpl(view.getContext(), display);

    view.setLayoutParams(wparams);

    mViews.add(view);
    mRoots.add(root);
    mParams.add(wparams);
  ...
}
adjustLayoutParamsForSubWindow() 处理逻辑:
如果当前要添加的窗口是,应用窗口,如果其 token 为空,则会把当前 PhoneWindow 的 mToken 赋值给 token。如果是子窗口,则会把当前 PhonwWindow 对应的 DecorView 的 mAttachInfo 中的 mWindowToken 赋值给 token。 —– 来自 浅析 Android 窗口
添加操作最后是由 ViewRootImpl 完成:
    public void setView(View view, WindowManager.LayoutParams attrs, View panelParentView) {
      ...
        res = mWindowSession.addToDisplay(mWindow, mSeq, mWindowAttributes,
                            getHostVisibility(), mDisplay.getDisplayId(),
                            mAttachInfo.mContentInsets, mAttachInfo.mStableInsets,
                            mAttachInfo.mOutsets, mInputChannel);
      ...
    }
public interface IWindowSession extends android.os.IInterface {}
从 IWindowSession 的继承关系可以看出,WindowSession 是一个 Binder 对象,所以说 Window 的添加时一个 IPC 过程,它最终将交由系统进程的 WindowManagerService 来完成添加。
和添加过程一样,Window 的删除和更新都是 IPC ,最终都交由 WMS 来完成。